

First steps after installing WordPress
Installing WordPress is the beginning of a shorter or longer period of work on a new website. To get off to a good start, it’s worth doing a few steps to make your future website safer, more efficient, easier to position and free of popular bugs.
Spis treści
Hide a page from others
If you create a page immediately on the target server and at the target address, it is worth making sure that the effects of your work are not visible to others before the official publication of the site. That’s why it’s worth it first:
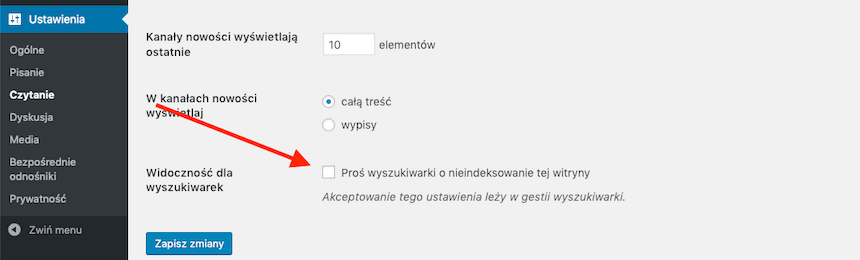
1) Make sure that page indexing is disabled – so that no strange, test data related to your domain will appear in search engines. Indexing can be disabled at the stage of WordPress installation and after its installation in the cockpit in the section “Settings -> Reading -> Ask search engines not to index this site”.
2) Install a plug-in that will display the page mode screen to non-logged users. You can find such plugins under the phrase “maintenance” in the official repository of WordPress plug-ins – choose one that meets your needs (and many of them have a lot of options for configuring the appearance of the page).
Organize WordPress after installation
The default WordPress settings may not fully meet your expectations. So there are a few things you might want to do to change it:
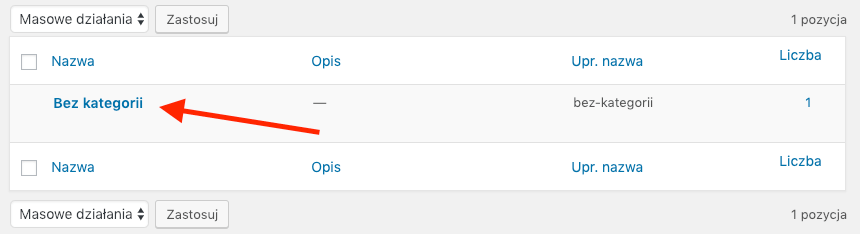
1) Change the name of the default category – the original name is “No category”. (or its translation depending on the selected WordPress language). Change it to the category name that will be used most frequently on the page for future entries (if you do not select a category for an entry, they will be assigned to this category).
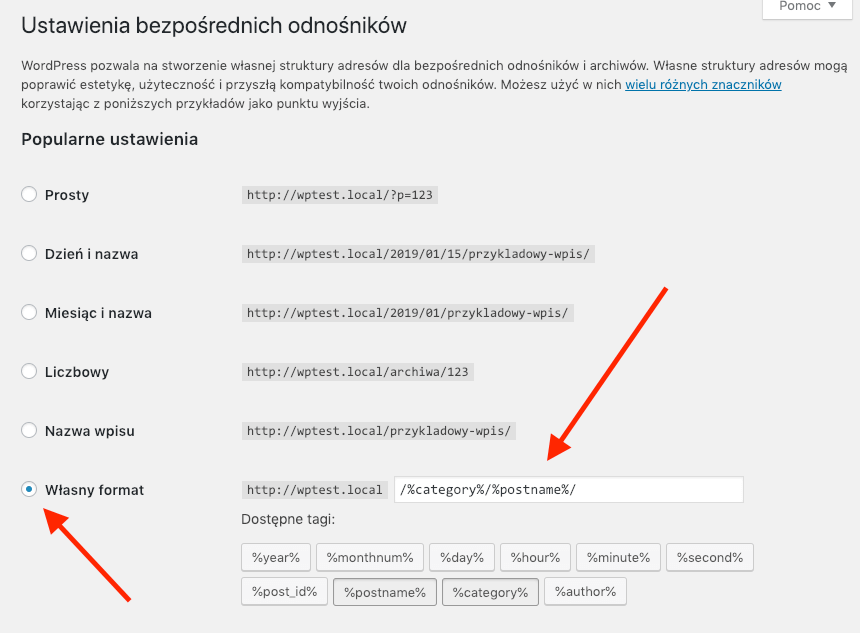
2) Select the preferred URL format for your website. In the “Settings -> Direct links” section you can select one of the many available formats. Personally, I prefer my own format in the form of /%category%/%postname%/ or a format called “Entry name”.
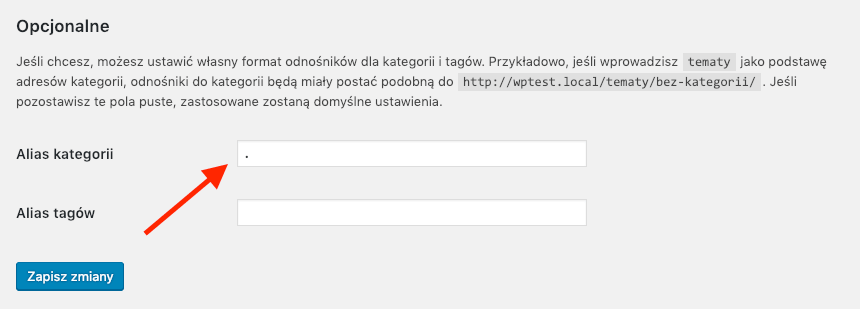
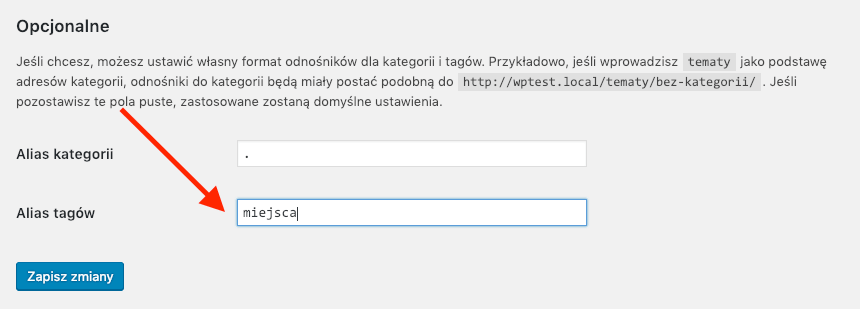
3) Hide the word “category” in the URLs. By default, entry categories have a prefix category in the address – and it is not translated. You can of course translate this prefix in the “Settings -> Direct links” section of the “Category alias” option, but it is usually even better to get rid of this prefix to shorten the URLs. One way to do this is to insert a dot as a value for the “Category alias” option:
4) Change the word “tag” to another word, especially if you use tags in a different sense than the default. WordPress tags can be used in many ways, so make sure that the prefix in the URL before the tag name suggests how to use them. If, for example, tags on your travel blog are used to mark places, it’s a good idea to change the “Tag Alias” option in the “Settings -> Direct links” section to “places”:
5) Enable comment moderation (if you want to use it) – in the “Settings -> Discussion” section, enable the “Comments must be approved manually” option. This will protect you from publishing inappropriate content without your knowledge.

6) Check the time zone used on the page. If you are using a server located outside of Poland – it is worth to make sure that the time zone is set to the appropriate one in the “Settings -> General” section:

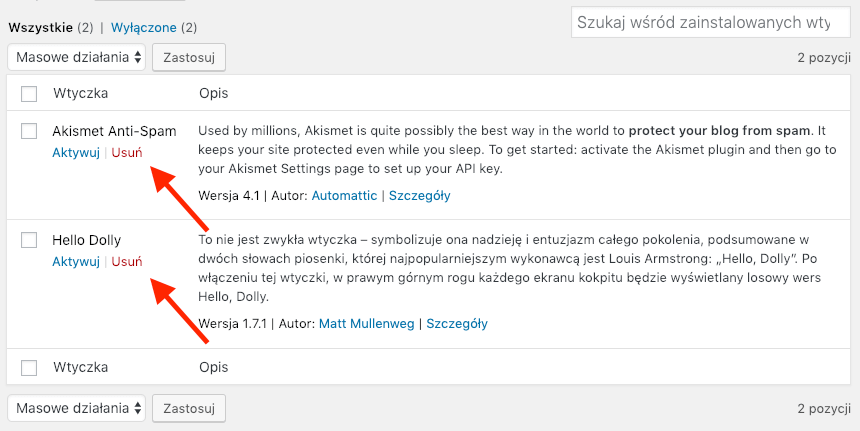
7) Remove the pre-installed plug-ins. The Hello Dolly plugin is unlikely to be needed, and the Akismet plugin may not be useful in many cases (especially if you don’t plan to have your comments on the site turned on).
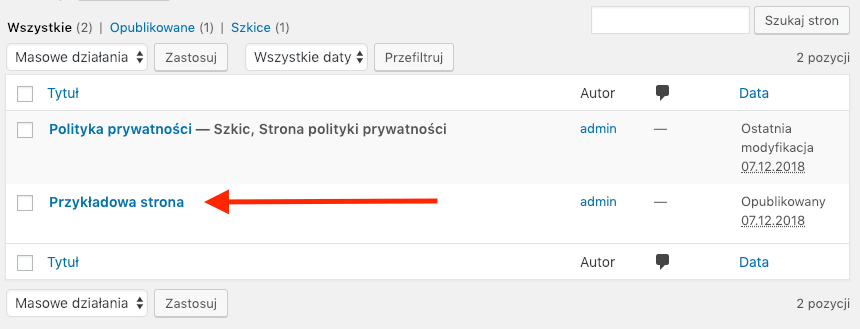
8) Delete default entry and subpage – WordPress creates the first entry and subpage by default, go to the “Entries” and “Pages” sections and then delete them. The privacy policy page can be left unchanged – most likely it will have to be used anyway.

Restrict access to other users
If other users have access to the cockpit, it is worth limiting their privileges immediately, so that they have access only to the WordPress functions they need.
This way, you can reduce the risk that the content manager will not change the configuration of WordPress or the design of the theme.
By default, WordPress has several user roles – their exact permissions can be found in the Codex table of WordPress.
If you are not satisfied with the default roles offered by WordPress, you can use a plugin that allows you to create your own roles with the permissions specified by the administrator. This plugin is for example AAM (Advanced Access Manager).
Install the basic plugins
Analyze what features your website should have and then search for plug-ins to meet your needs.
The following articles will help you in your search:
- How do I choose a WordPress plugin?
- Prohibited and forbidden plugins for WordPress
- Useful plugins for WordPress
Personally, I install the following 4 plug-ins on the websites:
1) Yoast SEO – thanks to it, WordPress is enriched with a number of options facilitating website positioning,
2) Regenerate Thumbnails – When you’re working on a theme, you almost always need to resize the images and photos you’ve already uploaded to the server to match the theme,
3) Two-Factor – to enable two-component authentication when logging into the cockpit,
4) WP Updates Notifier – thanks to it I get information which plugins need to be updated on my e‑mail.
Decide if you want Gutenberg.
WordPress 5.0 has introduced a completely new block editor – Gutenberg. Unfortunately, it is not yet fully developed and has problems with compatibility with various plugins. If you are worried about using the new editor on your website – you can restore the old editor by installing the Classic Editor plugin.
It is worth remembering, however, that the support for the old editor will not be developed infinitely – probably in the next 2-3 years you will still have to change to Gutenberg, although then it will certainly be much more refined.
Improve the file wp-config.php
In the wp-config.php file it is worth adding a few lines that will improve your work on the site and optimize its operation. That’s why you should consider adding the following lines:
1) define('WP_POST_REVISIONS', 5); – with this line you will limit the number of stored revision entries to the maximum of the last 5. This will ensure that frequently edited entries and pages will not generate too much information in the database. Remember, however, that you will not be able to go back in the history of editing too long after this change.
2) define('EMPTY_TRASH_DAYS', 7); – this option changes the time of storing entries in the recycle bin to 7 days instead of the standard 30.
3) define('WP_DEBUG', true); – this option starts debugging mode in WordPress. Thanks to this, any errors appearing in the process of working on the website will be easier to track. Of course, when you finish working on a page, you should remember to turn this option off.
4) define('SCRIPT_DEBUG', true); – with this option, all WordPress scripts will be loaded uncompressed, which should make it easier to debug JavaScript problems built into WordPress. As with the “WP_DEBUG” option – Remember to turn it off when the work is finished.
It’s time to act
After the described actions it’s time to start working on your new website :) Soon we will describe what is worth doing before the website is published.
Be up to date

Check other blog posts
See all blog posts
Why is it a good idea to split sites across different hosting accounts?
Read moreMultiple websites on one server is a threat that can have different faces. Find out what the most important ones are and see why you should split your sites on different hosting accounts. Powiązane wpisy: Compendium: how to secure your WordPress? Everything you have to keep in mind when creating an online store Useful plugins…

How do you get your website ready for Black Friday or more traffic?
Read moreToo much website traffic can be as disastrous as no traffic at all. A traffic disaster results in server overload. In such a situation, no one is able to use e.g. your online store’s offer, and you do not earn. Learn how to optimally prepare your website for increased traffic. Powiązane wpisy: Compendium: how to…

Password management or how not to lose your data
Read moreDo you have a bank account? Use the internet with your smartphone? Congratulations! Then you are on the brighter side of the power, where digital exclusion does not reach. But can you take care of the security of your data as effectively as you invite your friend for a beer via instant messenger? Powiązane wpisy:…