

Useful plugins for WordPress
Since we already know how to choose a plugin, maybe it is worth considering what are the recommended WordPress plug-ins? I’ll describe some of them, which I often meet in different projects. Remember that you should use the plugins with caution and not install them if they are unnecessary.
When installing the plug-ins, you should take care of order on the server and in WordPress itself. Some of the recommended plugins are used for installation and one-time startup. After finishing work, they should be removed.
Spis treści
Two Factor Authentication
I don’t think there’s any need to convince anyone of the importance of two-factor authentication. This is also possible for WordPress using a plug-in:
You should also consider the Two-Factor plugin, which is included in WordPress beta tests. This means that it may be included in WordPress itself in the future.
WP Rollback
The WP Rollback plug-in is used to restore older versions of plugins and themes. In some crisis situations it can be used as a first aid in restoring the site to life.
Who is it for?
It’s a plug-in that we won’t need on a daily basis. It will be useful when updating the plugin/motif has caused big problems with the website and we want to quickly restore the previous, working version of the extension. In many cases, this approach will be faster than restoring a page from a backup – especially when we have to ask the host provider for a backup.
Please note that this plug-in will not always help. For example, if the plug-in made changes to the database during the update (and to this incompatible backward), this plug-in will not solve our problem.
How to use it?
The WP Rollback plug is very easy to use. After installing it, we will see an additional “Rollback” option next to each plug-in that comes from the official repository:

After clicking this option you will see the screen with the choice of the version you want to restore:
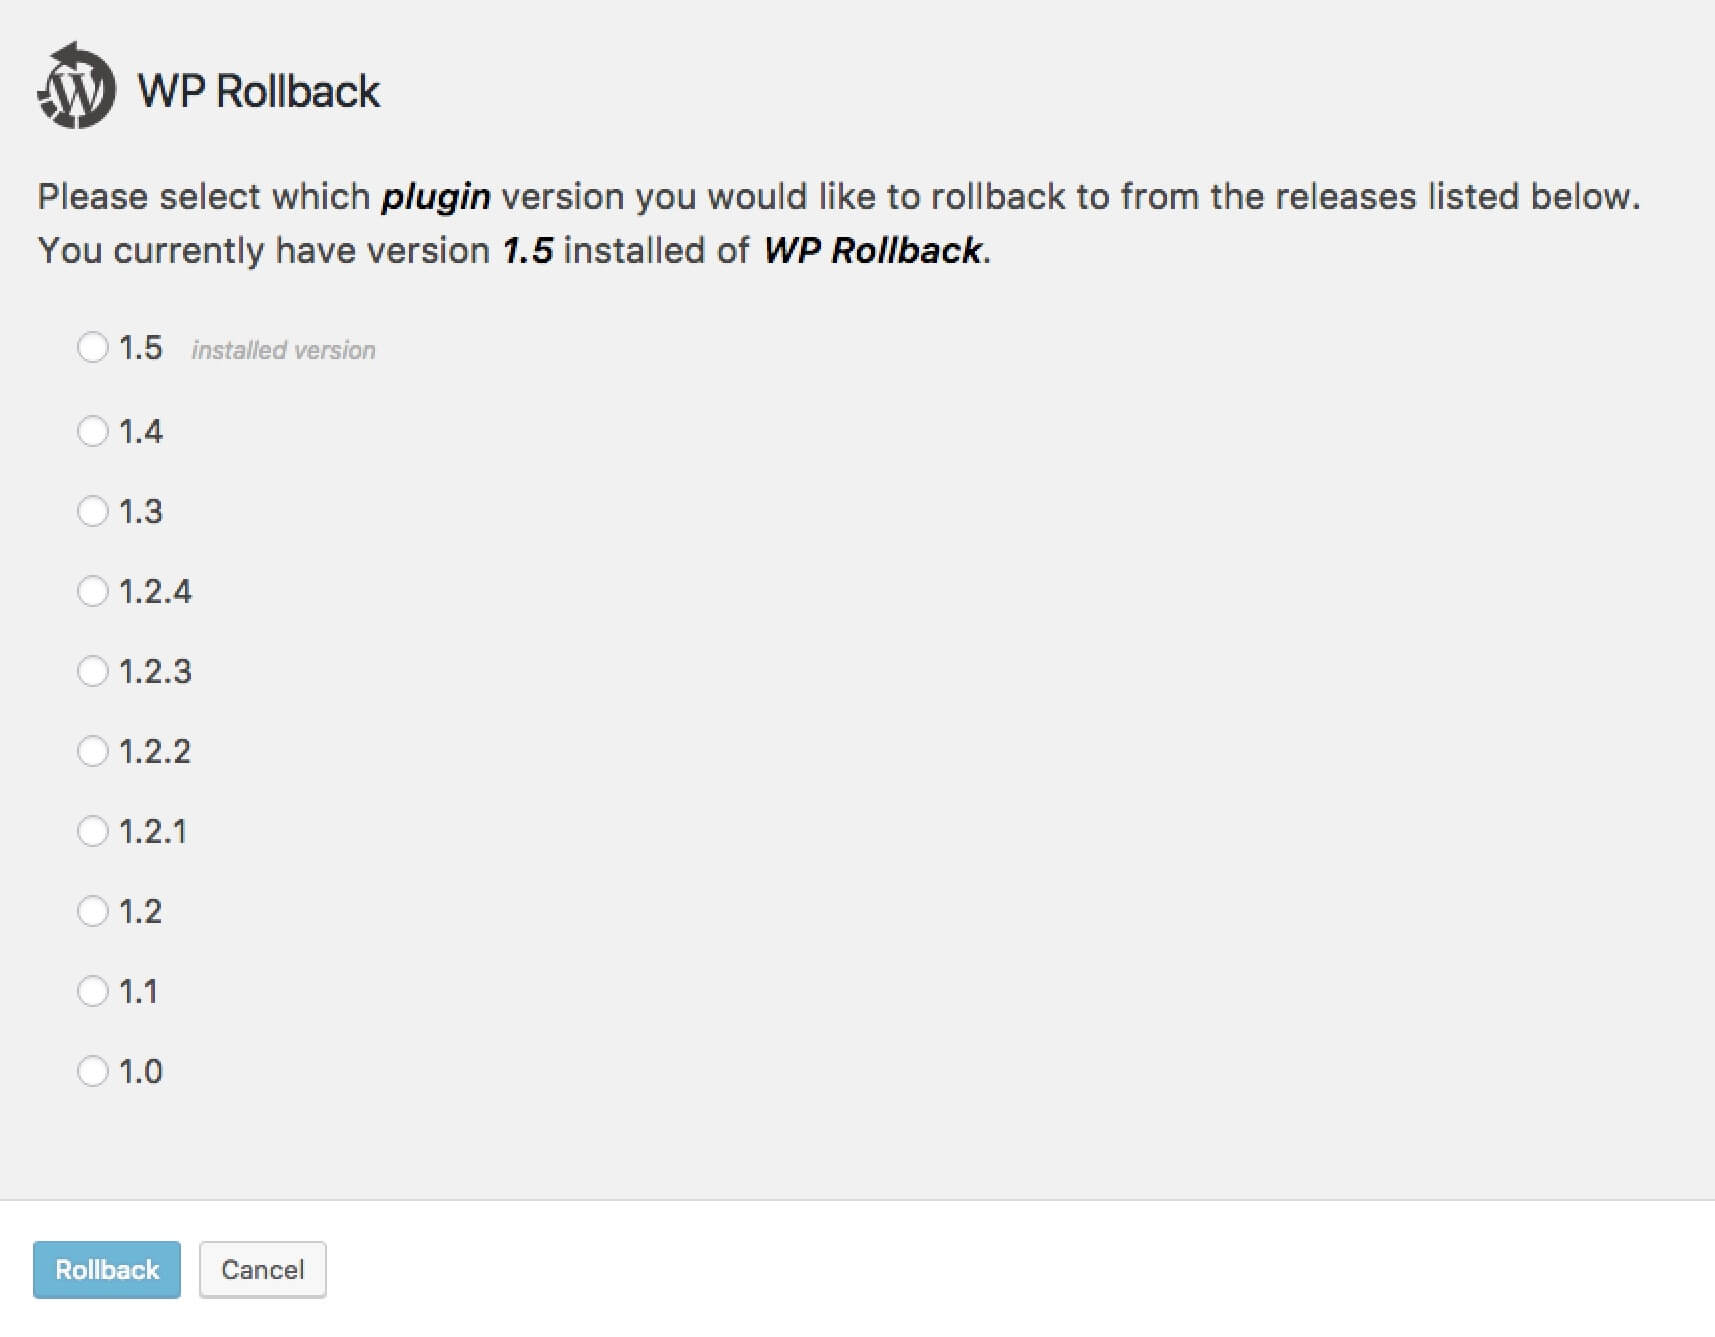
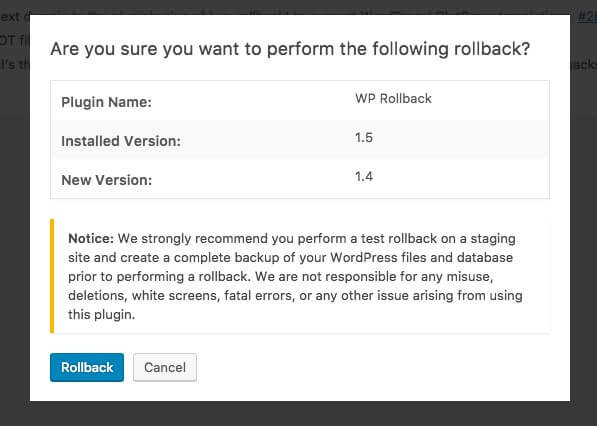
When we go to a given version, a link “View changelog” will appear, which after clicking shows the changes that took place in the plug-in in that version. After choosing the version and clicking on the bottom of the “Rollback” button we will see the last popup with the final confirmation of what we are doing:
It is worth noting that from the list of available versions we can also choose the currently used one. Thanks to this we can restore the plugin to its original state, if (it’s bad practice) we modified its source code.
In fact, the WP Rollback plug-in is simply a tool that takes advantage of the fact that the official plug-in and theme repository provides older versions of extensions for download. If it turns out that the cockpit of our WordPress is also unavailable after updating the extension, we can try to do what the plugin does by hand. Just go to the plug-in page and click on the “Advanced View” link:
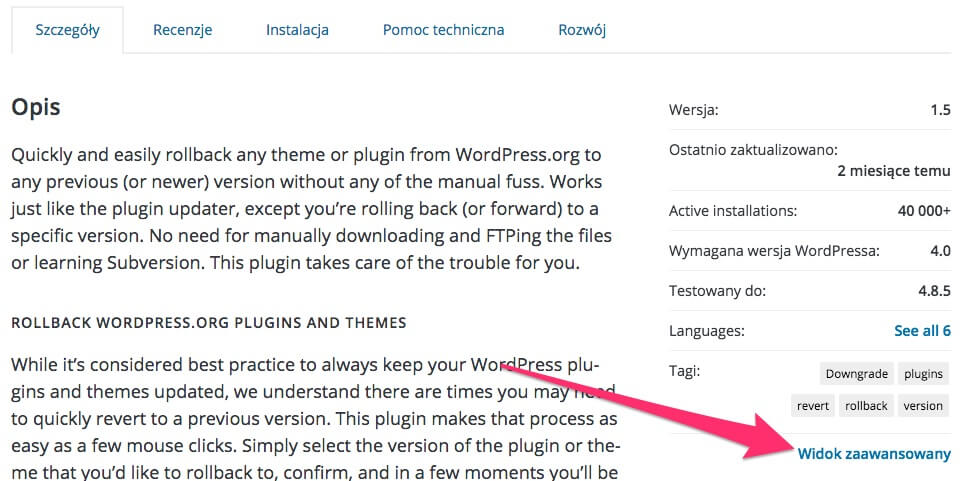
After opening this view at the end of the page you will find the section “Previous versions” – select the version you are interested in from the list and click “Download”.
Activity Log
Activity Log plug-in is used to monitor changes made by website users.
How to use it?
Such solutions are useful wherever we want to have control over what other people do in the cockpit or simply need to be able to prove to someone that the problem arose as a result of its changes. This practical cure for all “I didn’t move anything, it stopped working by itself”.
Jak jej używać?
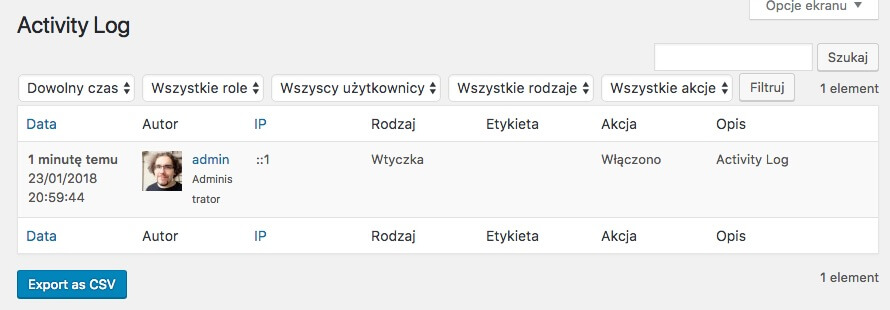
After installing the plug-in, you will see an additional item in the side panel of the cockpit called “Activity Log”. After entering the activity log we will see the first entry:
A detailed list of actions logged in by the plugin can be found on the plugin’s website in the official repository. As you can see, actions can be filtered by time, type, user or his role. In the case of websites with high user activity, the option of exporting logs in CSV format may be useful. In the settings you will find options determining how long logs are stored and the possibility to clear the log database.
The plug-in also offers the option of notifications – if the criteria specified by us are met (e.g. user X has updated any entry), an e‑mail will be sent to the given address with the given content.
- Please note that all users with an administrator role can view and clear the logs. Therefore, if you want to use the Activity Log plugin to settle the guilt, it is worth taking care that only trusted people have access to it (or preferably there should be only one administrator on the website).
- Settings for cleaning logs after a certain period of time are very important – if a lot is happening on the site, then logs may over time heavily burden the database of our site.
- Remember that for posts, WordPress has a tool for browsing post revisions – just click the “X Revision” button in the “Publish” block to view the changes you made to the post and find out who made them.
Regenerate Thumbnails
The Regenerate Thumbnails plug-in is used to generate thumbnails based on original graphics in the media library. It allows you to generate thumbnails for the entire library as well as selected photos.
Who is it for?
If your theme has changed, it is likely that the images already existing in the media library have non-optimal dimensions. This plug-in is also useful when we add additional dimensions of graphics in the code of the theme.
How to use it?
After installing the plug-in, you will see an additional item in the tools section: Renewal of thumbnails. When we go to it, we will see a tool for mass resizing of graphics.
Note the option “Skip regenerating existing correctly sized thumbnails (faster)”. – by turning it on, the plug-in will skip generating thumbnails that already have the correct dimensions. This is an ideal solution when, for example, we have added an extra image size to the theme – we will skip generating new thumbnails outside of one size.
In the “Thumbnail Sizes” section you can see the dimensions of the images currently used by our website.
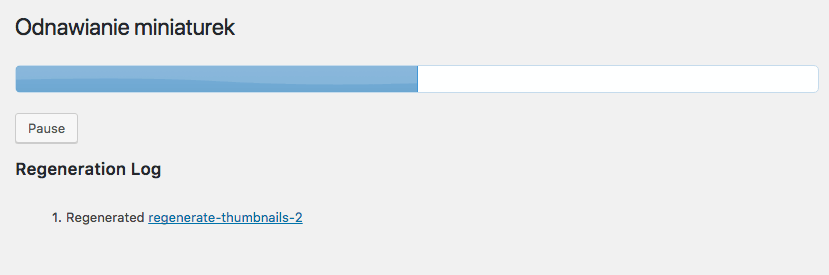
When you start renewing thumbnails you will see a progress bar – when it reaches the end, you can close the tab with this view:
If you open the media library and switch it to the list view, you will see an additional option “Renew thumbnails” after hovering over a given photo:
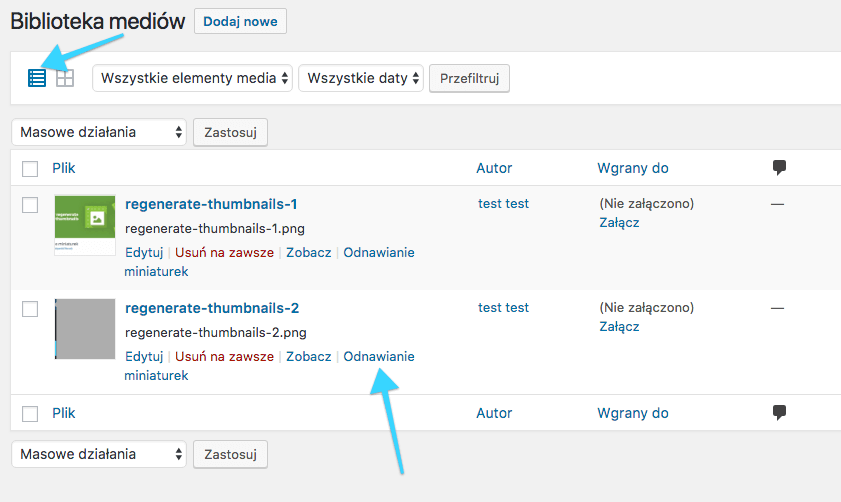
In addition, the “Renew thumbnails” option is visible in the “Mass actions” checkbox – so we can perform thumbnail renewal for selected photos and graphics.
If you click on the link to renew thumbnails for a given photo, you will go to a separate view.
Especially useful is the list under the thumbnail renewal button, which shows us what thumbnails have been generated and what names they have. Some thumbnails are not generated because the thumbnail would be larger than the original graphics, which would reduce the quality of the thumbnail.
- Sometimes we will see 0 pixels in the list of sizes – it means that the photo is scaled so as to adjust to the height or width. For example, an 800×0 pixel photo will be scaled down to 800 pixels in width, while the height will be kept proportionally even if it is, for example, 1600 pixels. If you have this type of photo and a thumbnail measuring 800×800 pixels, then a large disproportion in height to width will cause the photo to have 800 pixels high and 400 pixels wide. Thumbnails are created in such a way to adjust as much as possible to the given area – hence the footnote “(proportionaly resized…”.
- If the size has a footnote “(cropped to fit)” then the thumbnails will be trimmed to the given size – then the thumbnail from our previous example would simply have the dimensions of 800×800 pixels.
Smush Image Compression and Optimization
The Smush Image Compression and Optimization plug-in is used to automatically reduce the number of images that are sent to the media library. In addition, it has the option to optimize images and graphics that are already in the media library.
Who is it for?
This plugin will be useful for anyone who wants to optimize the process of reducing the size of images. Thanks to this plugin you will be able to load faster and get better results in tests such as Google Page Speed. I also recommend installing this plug-in when we are afraid, for example, that the customer does not understand that uploading 4000 x 3000 pixels is a bad idea.
How to use it?
After installing the plug-in, you will see a popup allowing you to quickly configure the plug-in.
We can specify whether we want to compress images automatically when uploading, whether we want to store EXIF image data (additional information such as camera parameters, image location, etc.) and we can reduce images that are larger than the specified size.
We can carry out mass compression of images from the media library – the free version of the plugin allows you to perform this operation on up to 50 images at once. Therefore, for larger pages it may be necessary to perform this operation several times.

Thanks to the above settings, we can change the settings from the popup, which appeared to us when installing the plug-in. In addition, we can specify which thumbnails we want to compress.
The plug-in also integrates with the media library view by adding the “Smush Now!” button, which allows you to compress selected images easily. Additionally, after compression we have access to compression statistics.
Thanks to this we can see how much space and transfer we saved by compressing a given photo.
- If you still want to compress your photos manually, I recommend TinyPNG.
- It is worth remembering that sometimes, after compression, it may be necessary to change the file format. Most often the JPG format turns out to be lighter than the PNG format, because it is based on lossy compression (so sometimes you can see the photos of the so-called artifacts).
Autoptimize
Autoptimize plugin is used to optimize the speed of page loading by compressing JavaScript scripts, CSS styles and HTML code.
Who is it for?
Virtually every website requires Autoptimize plug-in execution in order to achieve satisfactory results in load speed testing tools. However, it may turn out that the plug-in cannot cope with our website due to e.g. specific configuration or plug-ins used. In such a situation, it remains for us to perform the actions performed by the Autoptimize plug-in manually (if possible at all).
How to use it?
After installing the plug-in, a new option will appear in the admin bar:
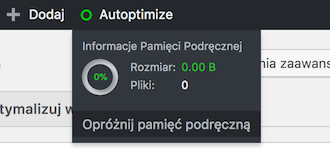
Clicking on “Autoptimize” will take you to the plug-in options view, and after hovering over it, you will see the size of the cache generated by the plug-in and the option of emptying the cache (useful when, for example, we changed something in scripts or CSS styles).
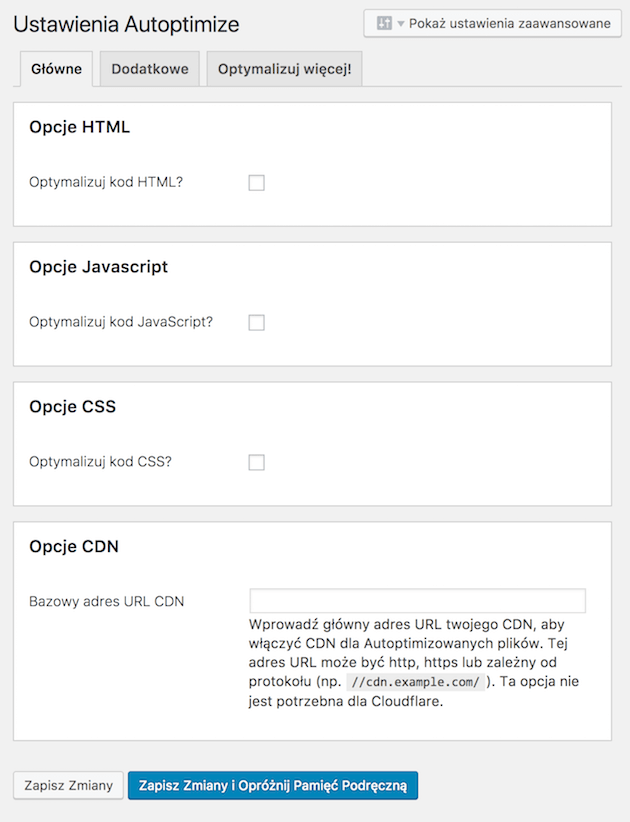
As you can see the settings of the plug-in are not too complicated. In the simplest case, simply select three checkboxes and save the changes. It is worth noting the advanced settings button, which will show more options for more advanced users, but their use usually requires more knowledge about the operation of the site and the resources used by it.
In the additional settings tab we can make additional optimizations, such as removing emotions or optimizing the process of loading Google fonts.
- It should be remembered that the optimization of the website code alone is not enough. It is also worth taking care of image compression – as a rule, graphics and photos are the main component of the entire page size.
Advanced Custom Fields
Advanced Custom Fields plug-in (also known as ACF) is used to create additional fields in the cockpit for the types of entries and taxonomy we specify. Its task is to use the native mechanism of custom fields, which has WordPress, and significantly accelerate the design of complex forms for editing in the cockpit.
Who is it for?
This plugin will be used on practically every page, which is not limited to the use of basic editing fields in the cockpit. Thanks to this plugin it is possible to implement e.g. entering entries according to a predefined structure, creating links between entries and the paid version it is even possible to create a simple page builder.
Please note that the ACF plug is only responsible for the interface on the cockpit side – it is in the user’s hands how the data saved by the plug will be used. Fortunately, this plug-in has very good documentation with examples.
How to use it?
After installing the plug-in, the “Custom fields” option will appear in the side panel. Fields are divided into groups. For each type of entries we can assign several groups of fields, they will be separate meta blocks.
The most complex screen is the field group editing screen:

It is divided into 3 main option groups:
- a list of fields,
- conditions determining where a given group of fields is to be displayed,
- group settings – appearance, location, etc.
Fields can be interdependent and of different types. In practice, thanks to ACF, we can create very complex forms, and thanks to the features available in the PRO version, we can also create fields that can be duplicated – this is a convenient solution when we create slides, customer reviews, etc. The fields can be used to create a variety of different types of forms.
An interesting feature offered by ACF is the ability to hide other blocks when a group of fields is displayed. We can, for example, define our own fields for linking entries and hide taxonomy blocks.
- An ACF plug is an example of a plug that has its own plugs that expand its capabilities. So if you’re missing some kind of field, it’s worth checking if someone hasn’t done a plug-in for ACF that solves your problem.
- We can add fields not only for entries but also for taxonomy. So if you have an ACF plug-in, you don’t have to install additional plug-ins responsible for e.g. a highlighted category or tag image.
- Created fields can be moved between pages thanks to built-in tools for export and import:
Disqus
The Disqus plug-in is used to integrate WordPress with a service of the same name. Disqus is a comment service that can be integrated into virtually any website. When enabled, Disqus replaces native comments available in WordPress.
Who is it for?
Disqus service, thanks to its popularity, offers many advantages for commentators, such as they do not need to log in to comment on an entry, it is enough to log in once in the service. Other advantages include: notification of comments and answers, moderation system, voting on comments, protection against spam, etc. Disqus is a free service, but in some cases advertisements may appear in the comments section. In order to avoid them, you should subscribe to a paid subscription or run a non-profit, private and non-profit website that does not earn money from other ads.
How to use it?
After installing the plug-in in the side panel in the comments section you will see the “Disqus” option. After going to this screen we will see a request to log in to your Disqus account, which we should have created beforehand (the link to the service is at the beginning of the entry).
When you log in and select a page, a button will appear leading to moderation of comments. In the upper right corner you will also find the link “Plugin Settings”, which leads to the screen with plug-in configuration.
In the settings you can specify where Disqus comments will be used, how the comments will be imported and whether they are to be rendered by WordPress for web browsers.
The plugin also has options related to the way the service scripts are rendered and an API configuration that allows WordPress users to log in to Disqus.
- Installing Disqus allows you to opt out of many plugins that offer similar features: anti-spam and add additional features to comments (voting for comments, formatting comments, etc.).
- Thanks to the synchronization of comments between Disqus and WordPress, there is no risk that if the terms of service change, we will lose access to the users’ archival comments with the resignation from Disqus.
WP Super Cache
WP Super Cache plugin is used to significantly speed up page loading by creating static versions of pages that are refreshed with a specified frequency. Thanks to this we not only speed up the loading of pages, but also reduce the server load.
Who is it for?
For most websites, the use of a cache mechanism is necessary in order to obtain satisfactory results in all kinds of speed tests. This is especially important in a situation when our website responds slowly to queries – as we know, users do not like to wait too long for the page to load.
How to use it?
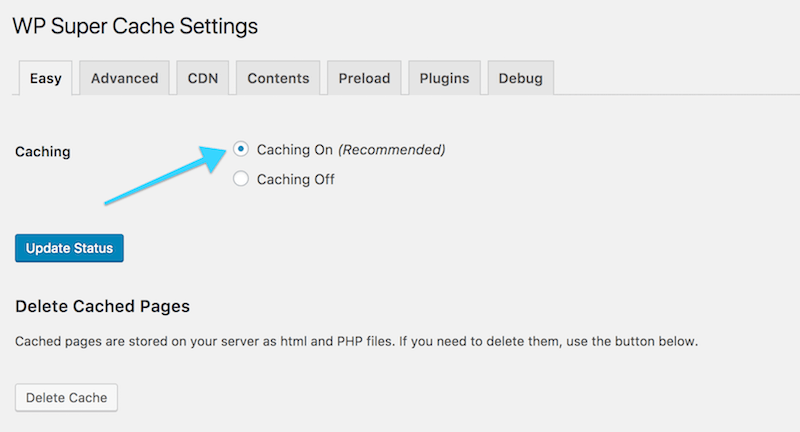
After installing the plug-in in the side panel, the “WP Super Cache” option will appear in the tools section. The first thing we should do is to turn on the cache and save the settings:
In the “Advanced” tab you will find a number of additional options. The more our website is based on displaying unique content for specific users, the more configuration awaits us. Therefore, you should be especially careful when configuring caches for websites such as shops or websites offering the purchase of virtual resources.
In general, I recommend that you enable the recommended options and check if the page behaves correctly. The plugin has options to clear the cache after a certain time or at specified intervals.
- There are many different plugins responsible for the cache mechanism, but I chose WP Super Cache because:
- This is a popular plug-in (more than one million installations), so it has been tested on a large group of websites,
- has a convenient and simple (especially in comparison with some competitors) configuration,
- is created by developers from Automattic, the company that contributes the most to the development of WordPress.
- Sometimes changes on the page using the cache may not be directly visible on it – it is worth to clear the cache to force refreshing the content.
- The fact that we see changes on a page that uses the cache mechanism does not mean that these changes are visible to users. This is due to the fact that when we are logged into the cockpit, the cache can be disabled. Therefore, if you publish content that should be visible immediately, it is a good idea to view the site in incognito mode.
- The cache is generated the first time you visit a given subpage. Therefore, we can have an impression that despite running this mechanism, the page has not accelerated – and during the second refresh of the page, it should load much faster.
Duplicator
The Duplicator plugin is used to migrate and back up pages based on WordPress. In this entry I will focus on page migration.
Who is it for?
This plugin is dedicated to people who need to easily move a page between servers or publish a page that has been developed so far locally.
How to use it?
When you enter the Duplicator, you will see a list of copies of the page that were previously created. By clicking the “Create New” button you can create a new copy for migration:
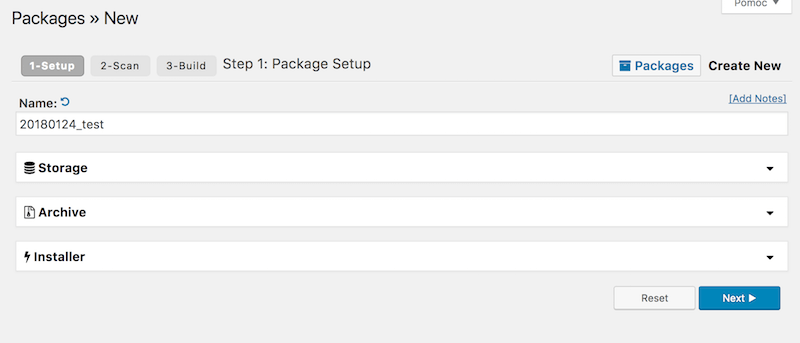
The backup process consists of three steps: configuration, analysis and backup:
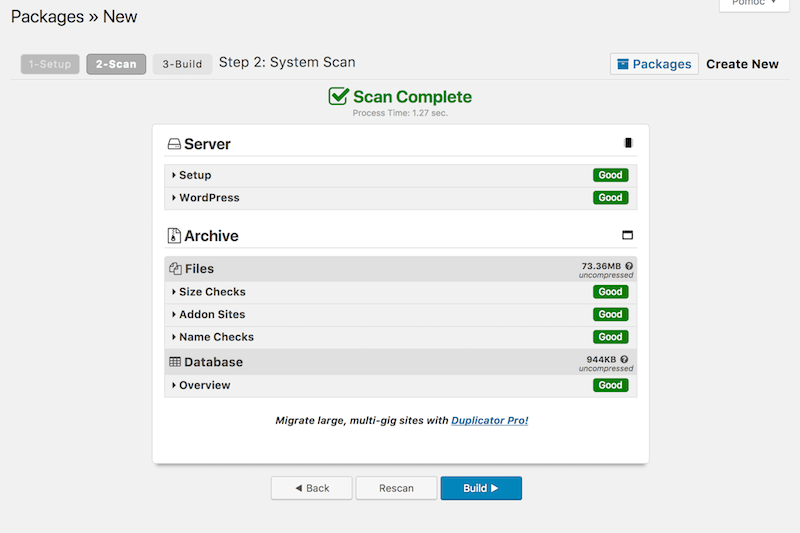
Copying may take some time, depending on the size of the page. Once a copy has been created, we can download the files needed to migrate the page.
Installer and archive files should be placed on the target server and then in the browser open the address to the location of files by adding “/installer.php” at the end.
In the first step, select the checkbox and click “Next” (if you see “Pass” in the “Archive” and “Validation” sections, otherwise it is worth checking if there are no problems with server and archive configuration).
The migration process will start and then we will be asked to provide data to connect to the database:
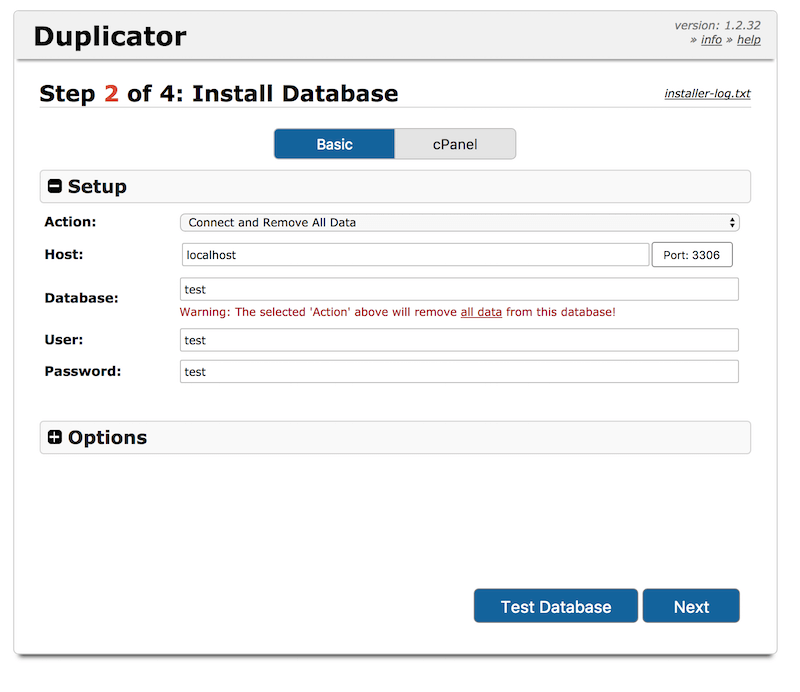
It is worth noting that the default settings will clear the given database and fill it with the data of the migrated page. After clicking “Next” we will be asked to confirm the data. Then we will be able to verify the URL, path to files and change the title of the page (in the additional options we can also change the administrator’s data). After clicking “Next”, the migration will be completed and the option of logging in to the migrated page will appear.
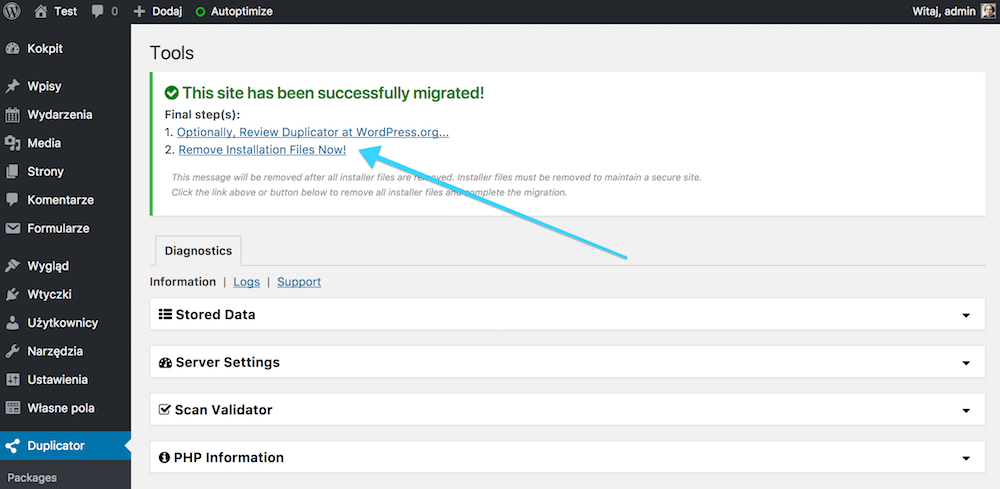
After logging in, perform the last operation – removing files used for migration:
- Solutions such as Duplicator may not work in the case of more complex websites that require proper server (or servers) configuration, in such a situation it is better to rely on performing the migration process independently.
- Good practices assume that the website should have at least 3 versions:
- where new functions are created and tested,
- where new functions are tested before implementation for production,
- which is available to the public for Internet users.
- In the context of this division, the duplicator is quite a slow solution and will be slower the bigger the party is.
UpdraftPlus WordPress Backup Plugin
The UpdraftPlus plug-in is used for backing up and restoring WordPress from these copies.
Who is it for?
This plugin is dedicated to people who want to have their own backups of their services, independent of backups made by hosting. There may be many reasons, e.g. lack of quick access to hosting backups, need to make frequent backups, problems with hosting backups in the past.
Note: Backups should be stored outside of your hosting account. Thanks to this: no additional space is needed, we avoid making backups and protect ourselves in case of a serious server failure and when the backups of the hosting do not work.
How to use it?
After installing the plug-in in the side panel, a new “UpdraftPlus Backups” option will appear in the settings. When you enter the plug-in settings view, you will see tabs and options for creating and restoring backups, as well as information about the last backup you made.
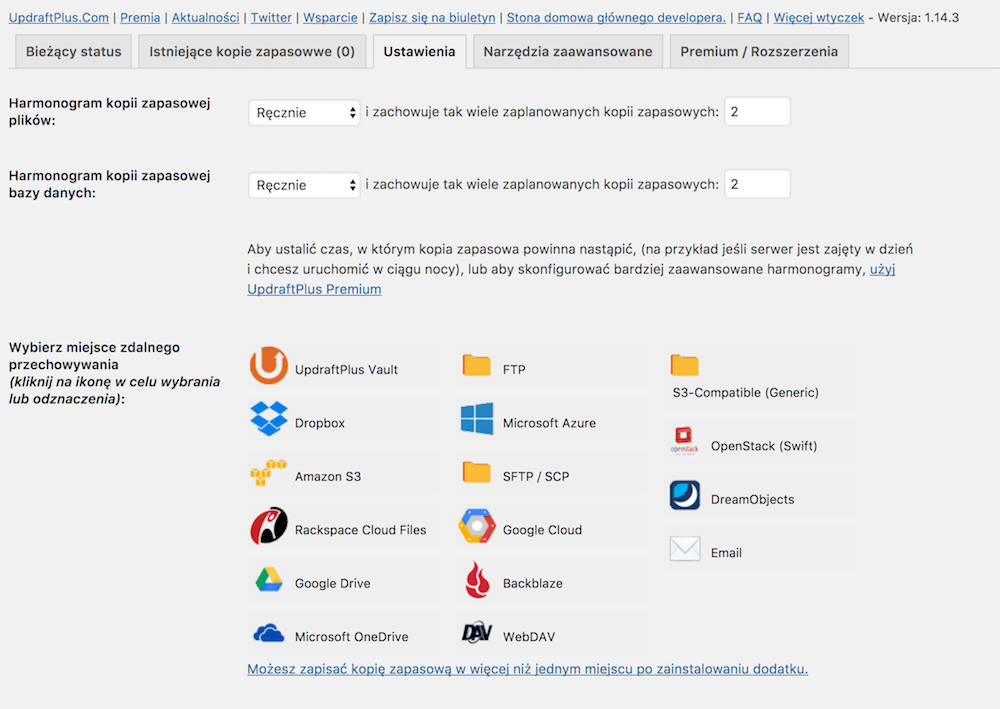
On the Settings tab, you can specify where our backups are to be stored and the schedule for making backups (and the number of backups stored):
When you click on a backup service of your choice, you will be prompted to save your settings and click on the link to authorize the service. After authentication, the plugin will be able to store data e.g. on our Google Drive.
When you return to the “Current status” tab and click the “Back up now” button, a popup will appear asking you to select the backup components. After selecting the backup content, you can click the “Back up now” button – you will be informed about the progress of the backup:

This process may take shorter or longer, depending on the size of our website and selected elements of the backup. Once the process is complete, we can go to the tab with existing backups.
Backups in this plug-in are divided into 5 parts: database, plug-ins, themes, uploaded files and other files. In this way, if you want to restore a theme to its pre-shift state, for example, you only need to change the directory of the themes from the backup.
When you click the “Restore” button next to a given copy, you can choose exactly what you want to restore.
Yoast SEO
Yoast SEO plug-in adds to WordPress a number of functions that can positively influence the positioning of our website.
Who is it for?
This plugin is one of the mandatory items for most WordPress installations. This is due to the fact that it adds a lot of functions necessary for positioning: page maps, control over meta-titles and meta-descriptions, makes it easier to share entries on social networking sites, etc. The plug-in is a very useful tool in the case of WordPress.
How to use it?
This plugin is one of the mandatory items for most WordPress installations. This is due to the fact that it adds a lot of functions necessary for positioning: page maps, control over meta-titles and meta-descriptions, makes it easier to share entries on social networking sites, etc. The plug-in is a very useful tool in the case of WordPress.
It is worth knowing that by default the Yoast SEO plugin does not show all configuration options. To enable them, go to the “Features” tab and enable the option in the “Advanced settings pages” section:
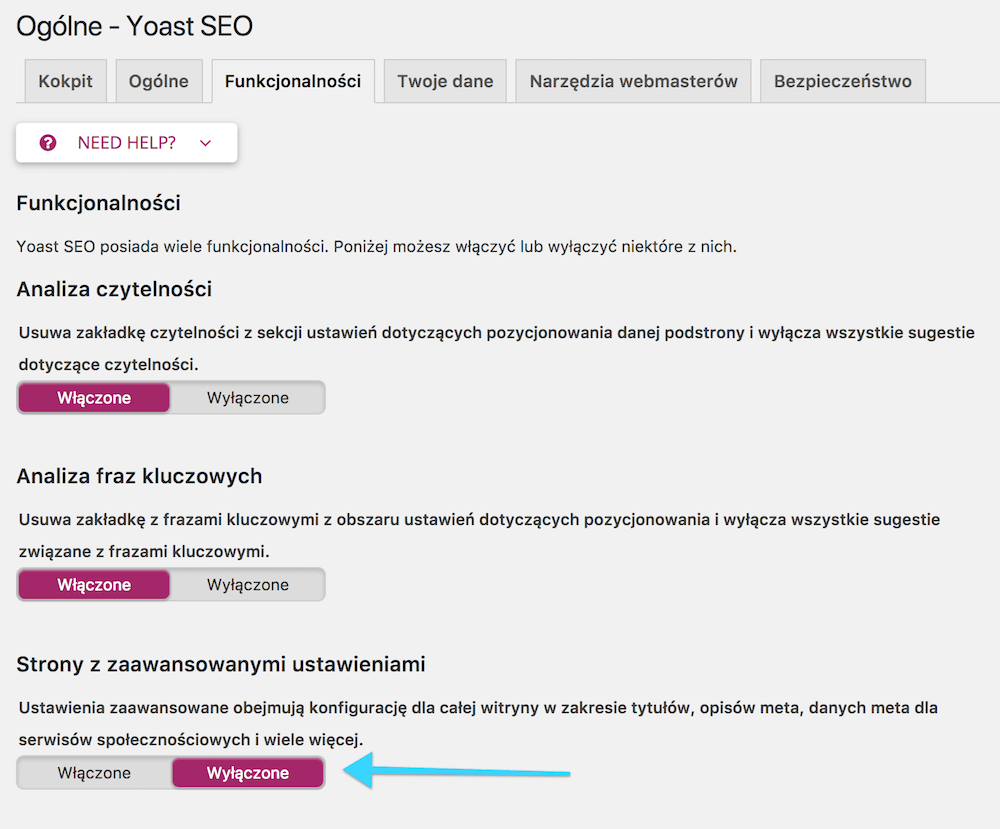
Thanks to this procedure we will get access to managing the appearance of titles of particular types of subpages. There will also be options to manage profiles in social networking sites and access to the configuration of the page map, which speeds up the process of indexing our site.
Additionally, when editing each subpage, entry or category we will see the “Yoast SEO” block, which contains settings for that particular subpage:
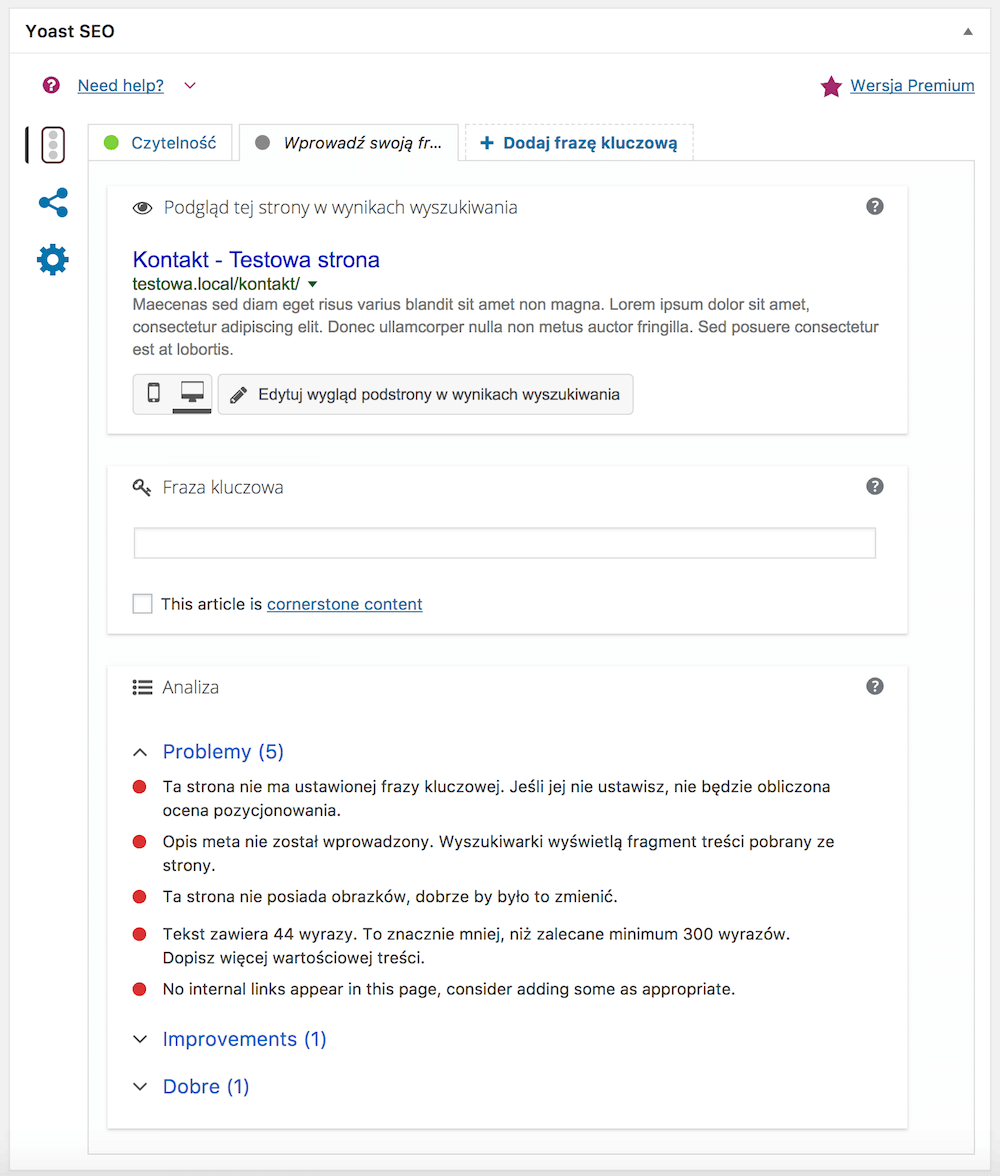
As you can see, we can modify the appearance of the page in search results, specify the key phrase and analyze the problems found. In the “Readability” tab, you will find information about the level of readability of a given subpage.
On the left side there are 3 icons which give us access to additional settings, e.g. related to sharing a subpage on social networking sites. Thanks to these options we have full control over how the link will look like on sites such as Facebook and Twitter. The last tab contains important options for indexing and canonical URL.
We can make sure that a given subpage will not be indexed at all by search engines or we can link it to a completely different URL thanks to the canonical URL option.
On all lists of entries you will also find additional columns showing the level of SEO optimization and legibility.
- Yoast SEO plug-in solves many problems that small plugins normally solve – that’s why it’s a good idea to make sure that we don’t have plugins that duplicate its functions, e.g. a plug-in that removes the text “/category/” from the links to the category of our site.
- W sekcji „Tytuły i Meta Tagi” w zakładce „Typy treści” możemy zdecydować, które typy podstron nie będą indeksowane. Jest to szczególnie przydatne jeśli chcemy uniknąć indeksowania podstron załączników, które są automatycznie generowane dla każdego obrazka w bibliotece mediów. This is especially useful if you want to avoid indexing subpages of attachments, which are automatically generated for each image in the media library.
Contact Form 7
The Contact Form 7 plug-in is used to create contact forms that send data from the form directly to a given e‑mail address.
Who is it for?
This is the ideal solution for almost any website that needs a simple contact form. In the case of more complex forms (multiple stages, dependencies between fields, etc.), its possibilities may not be sufficient.
How to use it?
After installing the plug-in, a new “Forms” option will appear in the side panel. After entering the plug-in screen we will see a list of forms:
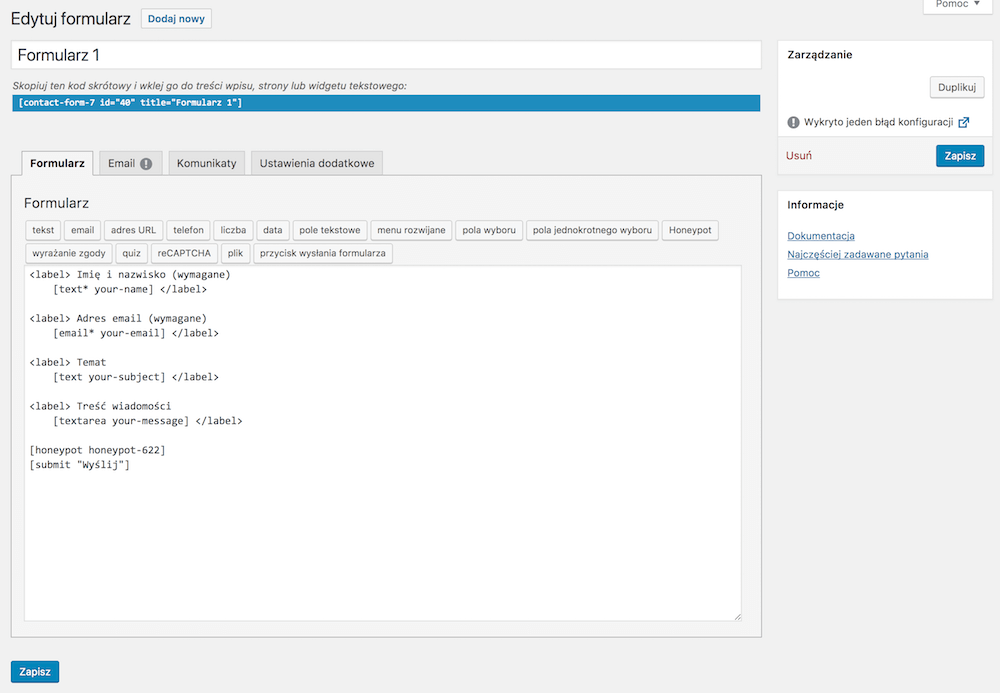
It is worth noting that we create forms using a solution resembling shortcodes – i.e. inserts surrounded by square brackets. When you select a given field type in the form tab, a popup with field configuration will appear. In the lower part of the popup we can observe how the given options affect the appearance of the insert creating the field.
In the “Messages” tab we can define the content of information displayed by the plug-in in various situations.
The “Email” tab contains the configuration of sent e‑mails. We can specify the recipient, sender, subject of the message, e‑mail headers and its content. It is worth noting that the inserts work in all fields.
Note: If we add a field to the form, we must remember to add an appropriate insert to the content of the email sent by the plugin – otherwise the data entered in the field will be lost.
With the option “Use email (2)”, we can define a second address to which the message will be sent.
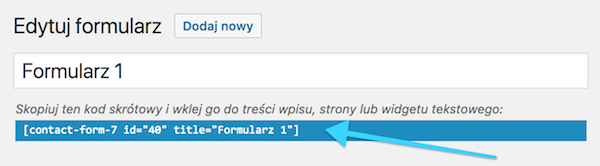
Once our form is ready and properly configured, we have to copy the shortkod visible on the blue background to the selected entry:
Please note that the form may require additional styling – it all depends on how our theme handles the formatting of the forms.
- Thanks to the support of inserts in the field for message headers, we can send a copy of the message to the person filling in the form using CC or BCC headers.
- Contact Form 7 plugin has support for Google ReCAPTCHA – it is worth protecting the form against bots automatically filling in forms.
- Another form of defense against spam is the Contact Form 7 Honeypot plug-in. It allows you to add a hidden field, which if selected by the bot (and the bots often select what will fall) will block the sending of the email.
- If you miss a field or need to create your own field related to the content of the website (e.g. a list of products from our online shop, which is updated automatically), we can create our own types of inserts.
Be up to date

Check other blog posts
See all blog posts
Why is it a good idea to split sites across different hosting accounts?
Read moreMultiple websites on one server is a threat that can have different faces. Find out what the most important ones are and see why you should split your sites on different hosting accounts. Powiązane wpisy: Compendium: how to secure your WordPress? Everything you have to keep in mind when creating an online store Useful plugins…

How do you get your website ready for Black Friday or more traffic?
Read moreToo much website traffic can be as disastrous as no traffic at all. A traffic disaster results in server overload. In such a situation, no one is able to use e.g. your online store’s offer, and you do not earn. Learn how to optimally prepare your website for increased traffic. Powiązane wpisy: Compendium: how to…

Password management or how not to lose your data
Read moreDo you have a bank account? Use the internet with your smartphone? Congratulations! Then you are on the brighter side of the power, where digital exclusion does not reach. But can you take care of the security of your data as effectively as you invite your friend for a beer via instant messenger? Powiązane wpisy:…